| Last update: 07. July 2019
Motors and servos preparation
Prior assembly, let´s prepare propellers and rudders we will need in following steps.
1.
Motors and servos preparation
3D printed parts
All STL files are already oriented for generating g-code with your favorite software. Check part list on the right side of this page for best printing results.

2.
Motors and servos preparation
Tools

1x Epoxy glue set - we use non fast curing, clear epoxy. Please check our eco guide before using chemicals.

3x Common party ballon

Heat shrinks - 3x for each motor in your AUV setup. Can be replaced with any other custom solution to seal the wire joints.
3.
Motors and servos preparation
Motors
1. Disassemble motor

Disassemble motor pulling out the clamp on the shaft of motor´s bottom.
2. Seal wires at the stator
Motor should has a proper isolation of wires. Best sealer is epoxy. You can use sirine for precise work, but you can do it carefuly with thin stick too. We must seal spot where isolation of wire starts - inside the stator. This are the only spots where the winding wires (connected to wires going out of motor) are exposed to water. Rest of winding wires are already isolated - they are coated from factory. Seal the ends of wire´s (those going out of motor) isolation as well. It prevent possible "hoosing" - water penetration in to isolation of the wire going out of the motor.
[picture will be available soon]
3. Attach propeller

Put the propeller holder in to the rotor of the motor. Print and use inserter to place propeller holder easier - to keep the part as needed - holes of holder in holes of rotor.

Attach propeller to face holes of holder part inside the rotor - they should be fixed together by screws from motor package and they should be fixed tight to prevent Propeller holder part to rub the motor´s winding.
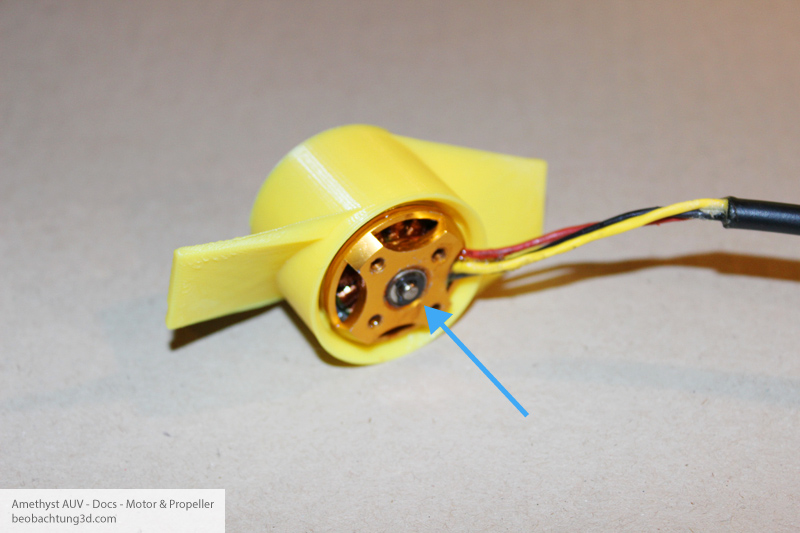
Assemble rotor with stator together. Don´t forget to use clamp to fix the shaft.
4. Join cables
Use heat shrink connectors to connect wires. You could alternatively solder wires together, use isolation from some stripped wire and then epoxy everathing to isolate them.
[picture will be available soon]
Also think about...
Some kind of sealing of stator's winding is vital for extended life of the motor. You could experiment with using of thin layer of some heat resistant varnish, paint, epoxy... Check discussions at OpenROV forum and use DuckDuckGo as well for crowd experience.
4.
Motors and servos preparation
Servos
Servo shoud be sealed as well. We have to use epoxy to seal cables getting out of servo housing and we have to seal the moving shaft. To seal moving part we gonna use rubber party ballon - specialy its neck.
1. Prepare and attach rudder adapter

Use one of the servo´s package arms, shorten it and carefuly glue with adapter. This two parts should be fixed together tight - do not leave arm and adapter non glued. But do not glue the hole for servo´s shaft.
2. Prepare sealing sleeve

Cut the needed piece of ballon neck. Keep the circled piece.
3. Seal servo's housing

Attach the sleeve on the servo as shown on picture. This way sleeve does not slip down from the servo. Then epoxy just one side - side pointed by blue arrow. Watch out not to epoxy hole for the screw below - we will need that hole (both holes) to fix servo to AUV. Other 3 sides of the servo should be left unglued (red arrow and face and back of the servo). We take care of them in next step. Let the epoxy cure.

Now move left side of sleeve down to position shown by red arrow. Epoxy rest of the sleeve to the servo´s body. There must be no loopholes. Epoxy rest of the servos body - spots where water could penetrate in : wires, screws on the bottom and spot where the servo´s two part housing is put together. Let the epoxy cure.
4. Seal the rudder adapter

Insert the rudder adaptor in to the sleeve. Half of the adapter´s body should be left out. Notice orientation against the servo. Flat side should face servo´s default front (center) position of shaft - notice the red arrow vs wire to determine right side and orientation. Notice hex hole on adapter as well.

Epoxy up the adapter with end of sleeve. There must be no loopholes. Use clothes pin to keep air from the sleeve before epoxy application and during the curing. Let the epoxy cure.

When the epoxy become cured, push the adapter towards the servo´s shaft and join them together. This way all should be moveable but hermeticaly sealed. Servo is prepared and ready to be mount with finn.
4. Prepare waterproof connectors
Original connectors coming with servos should be replaced with waterproof connectors of your choice. Wires must be properly isolated and waterproof in its entire length. Use heat shrink connectors to connect wires. You could alternatively solder wires together, use isolation from some stripped wire and then epoxy everathing to isolate them.
[picture will be available soon]


